
Hello, everyone. My name is Wendy and I’m the President of the Belgium Pulmonary Hypertension Patient Organization. I’m 45 years old and a patient myself, diagnosed back in 2009.
Today, I’d like to share with you something that has become an essential tool for us in connecting with the members of our patient organization. And that’s our digital newsletter.
A newsletter is a very powerful way to build and maintain relationships with your audience, but how do you make sure your newsletter stands out and actually get read? And where do you even begin? Which tools do you use? So in this presentation, I’ll walk you through how we approach this in our organization.
Here’s what we will cover today.
We will talk about understanding your audience and what they’re looking for. Choosing the right platform. And most important, getting started. This can be overwhelming and it’s the most difficult part, but if you do it step by step, you will manage.
We will talk about mailing lists and templates, creating engaging content, writing effectively, using visuals, sending and testing your newsletter, but also the following up and improving your content. Before you write a single word, ask yourself, who am I writing for? Are they patients, carers, healthcare professionals? What are their ages, levels of health literacy and digital skills? Can you actually reach them? Do you have email addresses? If not, would they be willing to subscribe? Do you have something valuable to share on a regular basis? And are you able to commit to write regularly? There’s no point at starting a newsletter if you have to stop after just one or two editions. Building an audience takes time and keeping them engaged requires consistency. So long-term mindset is key to making your newsletter successful.
First of all, when selecting a platform, considering some questions. What’s your budget? Some platforms are free for limited features while others require subscription. Think about what you can afford now, but also what you may need as your newsletter grows, because it’s not so simple to change once you’re used to a platform.
Do you want to segment your audience? Segmentation allows you to tailor content to different groups. Not all platforms support this, so it’s important to check.
How large is your mailing list? Some tools are better suited for small lists while others are designed to handle thousands of contacts. Make sure the platform can scale with your needs. So think ahead.
Do you need automation features? Automation can save time. For example, you may want to send a welcome mail to your new members or a member for upcoming events. If that’s important for you, look for platforms that offer these features.
And the most important, this is a critical point, is how is your user data handled? You must ensure that the platform complies with your local privacy laws. A good role of thump. If the platform is GDPR compliant, it’s likely to be a safe choice. So for those who don’t know who the GDPR is, the general data protection regulation is a privacy law from the European Union that sets strict rules on how personal data is collected, stored, and used. But even if you’re not based in the EU, GDPR has become a global standard for data protection. So many platforms that comply with GDPR also will meet or exceed privacy requirements in other countries in the world.
And the last question you can search for is what kind of support is available. Especially during the setup fast, you may need help. Does the platform offer tutorials, live chat, email, or even better support via online meetings? Having access to a good support can make a big difference when you’re just getting started. Especially because in the beginning, there are a few technical steps that need to be set up correctly, such as linking the platform to the domain name of your website and to your mail address. These settings are essential for ensuring your emails are delivered properly and that they don’t end up in the spam folder.
So let me walk you through our own experience in selecting a newsletter platform.
We initially started with MailChimp. This is a well-known and widely used platform. It’s one of the biggest advantages that it was free for small scale use. I think it was up to 500 context and 1,000 emails per month. It’s also very user-friendly, which made it easy to get started quickly. However, MailChimp, with Mailchimp, there were some concerns about the GDPR compliance, especially regarding the transfer of user data outside of the EU. And this raised some red flags for us.
So given our commitment to data privacy, after some time, we decided to switch to Flexmail, a platform based in Belgium. It’s fully GDPR compliant with European servers and it’s a Belgium company, which means we could get support in our own language. Their onboarding support was also excellent and we had several online meetings to get us started and they really searched for the best formula and set up for our needs.
But unlike MailChimp, Flexmail is a paid platform. It’s about 29 euros a month. However, as a nonprofit, we received a 30% discount, which made it more affordable. And this is a tip I can give to everybody. If you are looking at tools, especially pro tools, always look for the nonprofit pricing. Many tools like Microsoft 365, Adobe, Canva offer significant discounts or even free pro accounts for nonprofit organizations. So always look for them.
Before you can send out your first newsletter, you need to set up your mailing list. This is a very important step. Start by gathering all your context in one place. Most platforms allows you to import a list directly from an Excel or a CSV file. And also think about how you want to structure your list. For us, we choose to group context first by language, French and touch, and then by types such as patients, carers, healthcare professionals, sponsors. And this structure allows us to send more targeted and relevant messages to each group. Before importing, check how your platform expects the data to be formatted. Make sure your Excel or CSV file is organized correctly with clear and consistent column headers. For example, the first name, last name, email, language, group. These headers are often used by the platform to map the data during import. So getting them right is essential.
And also clean up your data, remove, duplicate, fixed typos, and ensure all required fields are filled in because a well-prepared file will save you time and prevent errors during the import process. Most platforms allow you to create a subscription form so people can sign up themselves, but in our case, we choose not to use one because we prefer to have full control over who is added to our list. This help us to ensure the quality and relevance of our audience. Maybe you will change this in the future, but for now, this worked best for us.
Once your mailing list is ready, the next step is to create a template for your newsletter. Most platforms offer intuitive drag and drop editors, so making it easy to design a professional looking layout even without technical skills. But however, there are some parts that you really have to provide in your template. For example, the header with your logo. The header is the first thing you readers see at the top of your newsletter. And typically it includes your logo, a banner image, sometimes a short tagline, and it’s usually fixed.
So it stays the same in every edition of your newsletter. This consistency builds trust and reinforces your identity. Then you can have an introduction by preference a personalized one. Most platforms allows you to insert reader’s name or other personal details. This gives a personalized touch to your mail, speaking directly to the receiver. Make sure that your template has a clear and visually appealing layout. Use white space, headings, and images to make your content easy to read and visually attractive. Use or structure your newsletter with recognizable sections. For example, news updates, campaign highlights, call to actions, upcoming events, calendar items. It makes that your newsletter is that by time people will recognize the different sections and they can easily scan your newsletter.
Then a very important part of your newsletter is at the very bottom of it. It’s the footer, which includes official information like your organization’s name and address, registration number, legal district, contact email, website, but also the mandatory unsubscribe link. This is mandatory under the privacy laws like GDPR. Unfortunately, most platforms automatically include this for you. So just make sure it’s visible and functional. Optionally, you can add some links to social media or privacy policy. And just like the header, the footer is also usually fixed. Once you have set it up correctly in your template, it will automatically appear in every newsletter, saving you time and ensuring compliance with legal requirements. So a well-designed template not only looks professional, but also build trust and encourage your audience to keep reading and saves you a lot of time.
Before start writing, it’s important to plan ahead. Decide how often you want to send your newsletter. Is it monthly, quarterly, or something else? And then work backwards from the Sunday to create a retro planning. There are some helpful tools here like Trello or Planner from Microsoft 365, where you can create lists and boards with topics for your newsletters and which allow you to work together in a group.
- So first, define your topics.
- Step two, assign the writing text amongst your team and agree on a clear deadline.
- Step three, find or create visuals.
- Once all content and visuals are ready, you can place everything in your newsletter template.
- After a final check, you can send your newsletter.
So let’s look a bit more in detail on each of these steps.
The heart of your newsletter is the content, and it should always offer something of value to your readers. Rather than overwhelming people with long text aim for short, engaging messages or introductions that link to full articles on your website. What kind of content can you use? For example, share practical advice, useful tools, or inspiring experiences that your audience can relate to. Keep your readers informed about what you’re doing, events, campaigns, milestones, or behind the scene updates. Include positive developments such as treatment options, research breakthroughs or community successes. And more and more, the voice of the patient is being actively sought. So your newsletter is an ideal channel to gather opinions, launch surveys, or ask for feedback. This will help you to understand what matters most to your community and ensures they feel heard and involved. So whether it’s a small piece of advice or a feeling good story, make sure each newsletter leaves your readers with something meaningful because if they consistently find value in your emails, they’re much more likely to keep opening them.
Okay. Once you have planned your content, it’s time to focus on how you write it. Your subject line is your first and sometimes only chance to grab attention. So make it short, clear, and something that makes the reader want to click and read the article. People often scan meals rather than reading them word for word. So help them by keeping your text short and simple. Use clear, consist, concise sentences. Organize, use bullet points and headings to structure your messages. Focused, visually appealing, and action oriented. So use buttons or call for actions like read more. Always write with your audience in mind. Use a tone that fits your readers and make sure your language matches the level of your audience. Consider their health literacy. Avoid complex medical jargon unless it’s absolutely necessary. So if you do so, and if you do use medical terms, explain them clearly in plain language.
This ensures your message is actionable and inclusive for everyone. And remember, use an active voice. It’s more direct, engaging, and easier to understand.
What about the layout and the visuals? Well, keep your design and colours consistent. Avoid using too many colours. Instead, choose a few colours that match your logo or branded identity and use them consistently throughout your newsletter, in your titles, text and visuals. Also, make sure your text alignment is consistent. And a tip I can give there is that most platforms use content blocks. And to keep your layout uniform, just copy an existing block and simply replace the text. This will ensure the same formatting is applied every time. Also, be aware about your phones and sizes. Choose two or three fonts and stick to them. For example, one for the titles, one for the body text and one for quotes or highlights. Make sure the font size is easy to read on both desktop and mobile devices. And it’s also important to look at the colors and that there is enough contrast between the font and the background.
This will help your readers to … It’s more easier to read if there is enough contrast. Using visuals that are the same dimensions or aspect ratios helps make the content easier to scan and gives your newsletter a more professional and organized appearance. There, you can use tools like Canva or Adobe Express. They are great for creating visuals that match your style and dimensions. And most of these design tools allow you to download your visuals in smallest file size like compressed or web optimize. And this will help you keep your newsletter light and fast loading without sacrificing visual quality.
So then you’re ready to send your mail, but not before doing some final checks. For example, craft an appealing submit line and a preview text. This is the first thing people see in their inbox, and it determines whether they will open your email or not. Always send a test email to yourself or small group before fully sent. This will allow you to check formatting, layout, and how it looks on different devices. And an important one is maybe to ask someone else to review it because a fresh pair of eyes can catch mistakes that you have missed because you have worked on it too much from typos to broken links or unclear wording. And about the links, if you use links, test them all before sending your email. Click every link in your newsletter to make sure they work and they lead to the correct pages.
It’s just an extra step with some tests, but taking this time will help you to ensure that your newsletter is not only beautiful and informative, but that it’s also error-free and effective.
Then we come to the follow-up because sending your newsletter is not the end of the process. It’s the beginning of a valuable learning opportunity because by tracking your results, you can understand what works, what doesn’t, and how to improve future editions. Most platforms provide information and track key metrics. Only sometimes it’s limited in free accounts, but mostly you can look at the opening rates, how many people actually have opened your email, the click through rates, which links were clicked and how much. And look also at the engagement. How do people interact with your newsletter? Do they replay it? Do they share it? Do it forward it? Are they signing up for events or filling out surveys? These insights can help you to learn what your audience wants, what your groups likes, and use this feedback to adjust your content, your layout, your timing, your tone, so you will get better at your newsletters. And very important, if someone replies to your newsletter, take the time to respond. It shows that you’re listening and it helps your readers to feel seen and heard. And even a short friendly reply can make a big difference in how your organization is perceived.
So now we have covered theory. Let’s take a look at a real life example. Here you have an example of one of our newsletters.
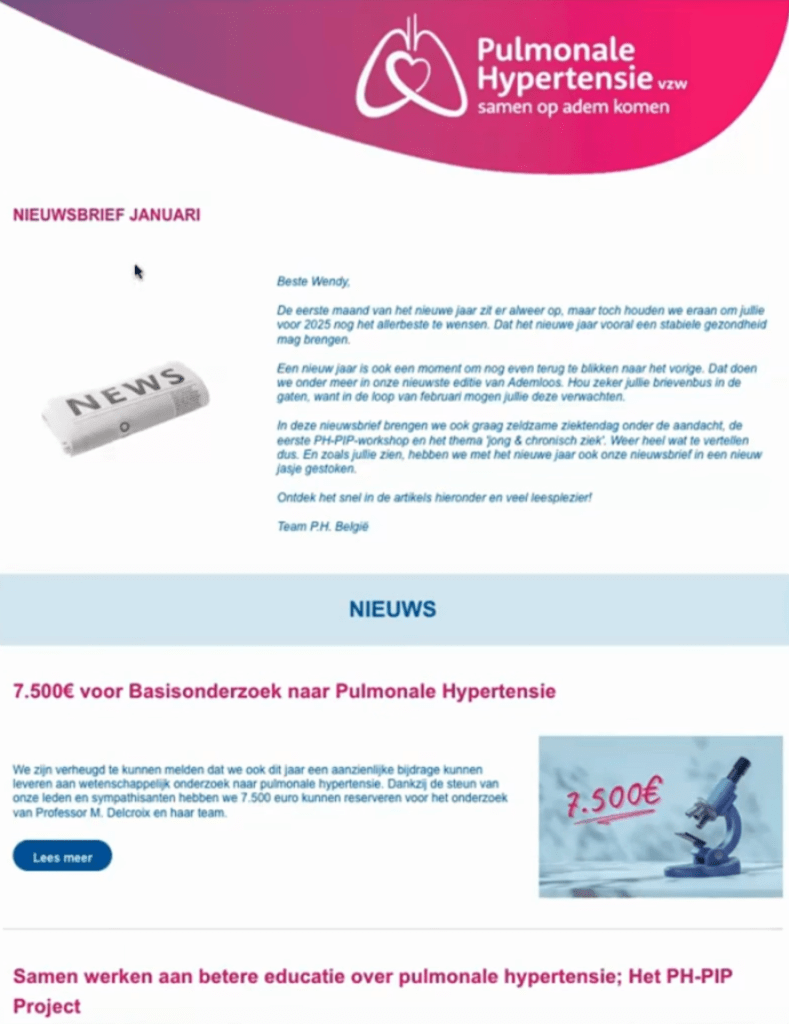
So if we look at it, then you have here the header with our logo and the title of the newsletter. Actually, this was the newsletter of January. Then we have a little intro with a personalized speech. So here there’s a little bit of code that will take the first name of your reader and it’s making that it’s more personalized than if you just say, okay, dear somebody. Then we have some different sections like news. You have some articles with news, actions, and then gifts. So each article has a title, a clear title. It’s always like one-third for the image, two-thirds for the text, a little intro, and then you can go to the website to read more.
There’s always a blog that is in our newsletter with calls for surveys or something and a calendar with the upcoming events. And then underneath this pink line, this is the footer. So in the footer, you will find, it’s always the same. You will find the links to our socials, a call to action to support us, the logos of our sponsors who make this newsletter possible. And here in the pink square, you will find all legal information that is mandatory. And underneath, you have the inscription button. So then you have everything that’s needed. And every times you have the same footer, you have this block, some different sections with some articles, an intro and the header. So that’s an example of our newsletters. So as we wrap up, there are some key points to keep in mind when creating your newsletter.
- First, know your audience, understand who you’re writing for, their needs, interest, and preferences.
- Choose the right platform.
- Select a tool that fits your goals, budget and technical comfort level, and make sure it’s privacy compliant.
- Start small and grow.
- Don’t try to do everything at once.
- Begin with a simple structure and build from there as you gain confidence and feedback.
- Focus on clarity, consistency, and value.
- So keep your content easy to read, visually consistent, and always offer something useful and meaningful to your readers.
- Test, learn, and improve.
- Use data and feedback to refine your approach, and every edition is a chance to grow and connect more deeply with your group.
So if you remember these points, you’re well on your way to creating a newsletter that informs, inspires, and engages. And I hope this pap talk was helpful for you, and I wish you a lot of success in creating your own newsletters.
So have a great day and see you later. Bye.